Pyle PLCD14MRKT Owner's Manual
Browse online or download Owner's Manual for Car media receivers Pyle PLCD14MRKT. Pyle PLCD14MRKT car media receiver User Manual
- Page / 16
- Table of contents
- BOOKMARKS
Summary of Contents
OWNER’S MANUALMobile Audio System• MP3/CD Player• PLL Synthesizer Stereo Radio• Compact Disc Player• Automatic Memory Storing• Full Detachable Panel
10RADIO OPERATION• SWITCHING TO RADIO MODEPress MODE button (6) shortly to select radio mode, the radio mode appears in the display together with the
11OPERATION• PLAYING ALL TRACKS IN RANDOMPress SHF button (23) to play all tracks on CD in random order. Press again to cancel the function.• EJECTING
12OPERATION(‘ ‘), then- Use the TUNE/TRACK UP/DOWNbuttons to list all songs under thisdirectory and select the title.- Press BND/LOU (ENT) button to
13REMOTE CONTROL HANDSETFUNCTION KEYS & CONTROL1. PWR Power ON/OFF Button2. DSP (0) Display Button (_,-,+,0 For MP3/WMA Operation)3. SEL Sound Mo
14OPERATIONDISC NOTEA. Notes on discs:1. Attempting to use non-standard shapediscs (e.g. square, start, heart) may damage the unit. Be sure to use r
15GENERALPower Supply Requirements : DC 12 Volts, Negative GroundChassis Dimensions : 178 (W) x 160 (D) x 50 (H)Tone Controls- Bass (at 100 Hz) : ± 10
TROUBLE SHOOTINGBefore going through the check list, check wiring connection. If any of the problemspersist after check list has been made, consult y
2CONTENTSInstallation ...3Take out screw before installation...3DIN Front-Mount (Method A) ...
3INSTALLATIONNotes:• Choose the mounting location where the unit will not interfere with the normal driving function of the driver.• Before finally in
grounding of the unit.Note to install the short threadingterminal of the mounting bolt to the backof the unit and the other long threadingterminal to
DIN REAR-MOUNT (Method B)If your vehicle is a Nissan, Toyota, followthese mounting instructions.Use the screw holes marked T (Toyota),N (Nissan) locat
USING THE DETACHABLE FRONT PANELREMOVING THE FRONT PANEL1. Press the release button (RELEASE)on the front panel and pull off the frontpanel.2. Keep fr
7WIRING CONNECTIONFRONT LchSPEAKERGREENGREEN/BLACKMEMORYBACK-UP (B+)MAIN UNITIGNITIONSWITCH (ACC+)POWERANTENNAREDGROUND (B–)YELLOWBLACKBLUEREAR RCA C
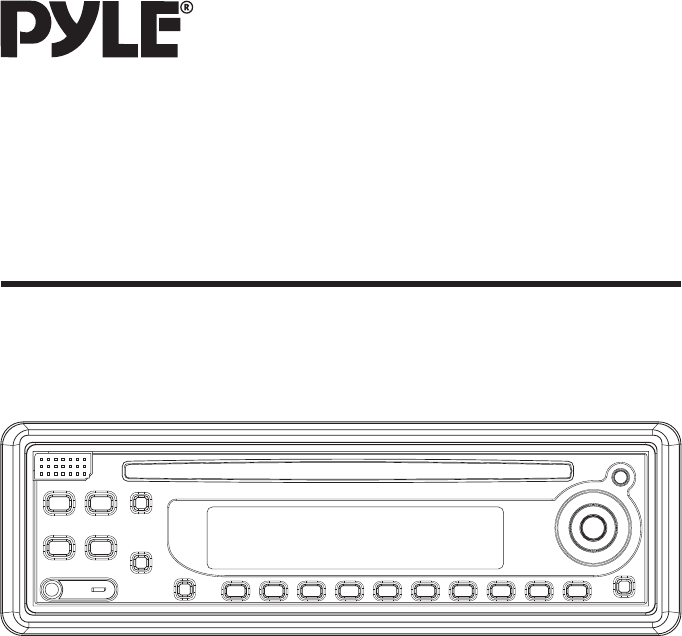
8OPERATIONLOCATION OF KEYS2479143 6 15 5 8 411 1025212322212018131917121626
9OPERATIONSWITCHING ON/OFF THE UNITSwitch on the unit by pressing any button(except button (7) and button (4)).When system is on, press button (9)
Related products and manuals for Car media receivers Pyle PLCD14MRKT
 (17 pages)
 (46 pages)
© 2020, manymanuals.com. All rights reserved. | 0.325 s |
 Manymanuals.com
 Manymanuals.de
 Manymanuals.fr
 Manymanuals.it
 Manymanuals.pl
 Manymanuals.cz
 Manymanuals.es
 Manymanuals-pt.com
Comments to this Manuals